TempusXR project can be run directly in plain static HTML file. It's super easy!
TempusXR comes with different types of tracking capabilities, including Image Tracking and Face Tracking. To minimize library size, each of these are independently built. Moreover, TempusXR provides native support for three.js or AFRAME. They are also being built independently. So altogehter, there are 2x2 = 4 sets of distributions.
AFRAME installation
For each type of tracking, there are two javascript files: tempusxr-[TYPE].prod.js and tempusxr-[TYPE]-aframe.prod.js
The first one is the core tracking library while the second one is a aframe extension. Normally, you will import the first script, followed by aframe library, then followed by the second script. We decided to not embed AFRAME inside TempusXR to make it more flexible. Also, for highly customizable applications, you can write your own aframe extension (second script).
There are two generally two ways to install the library.
TempusXR project can be run in plain static HTML file. It's super easy!
In this quickstart guide, you will build a AR webpage, which will start the device camera, detect an image target, and show an augmented object on top.
To give you a quick idea of how easy it is, below is the complete source for the example!
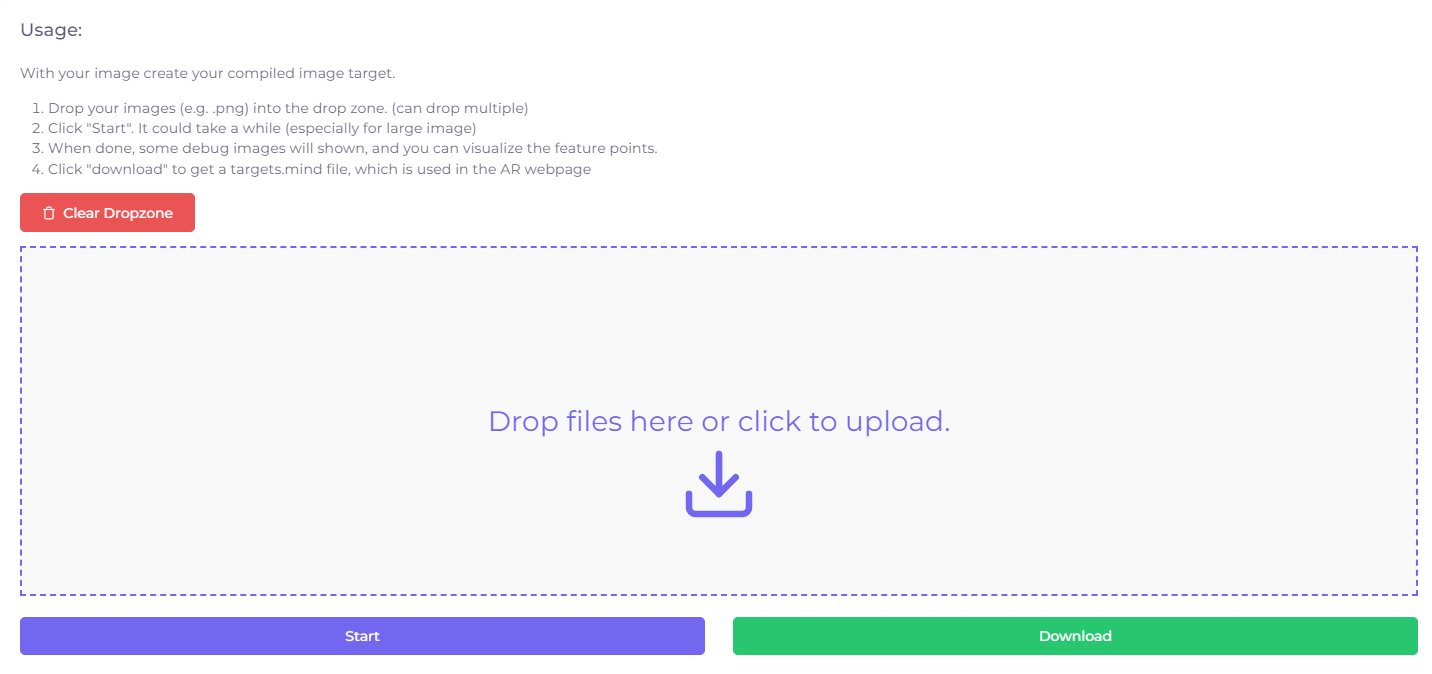
Before working on the webpage, we first need to preprocess (a.k.a. compile) the images. We need to scan the images and extract interesting locations (a.k.a. feature points) so we can detect and track the images later.
This preprocessing step takes time, therefore we want to do it beforehand as to reduce the loading time when users actually use your AR app later.
TempusXR comes with a super friendly compilation tool to do this. Image Targets Compiler
Once the compilation is done, we will see some features visualization.
This visualization tool gives you an idea of the feature distributions of your images. In general, you want to have good amount of features with well distribution. Actually, this sample isn't a very good one because you can see a blank space on the top left corner.
At the bottom of the visualization, you will see a Download button. This will gives you a targets.mind file. It stores the feature data in compact format, and we will need this later when building the webpage.
First, create a clean folder for your project, let say TempusXR-project. Put the targets.mind file there and create a blank html file, let's say index.html. So the folder should have two files like this:
Now, let's start with something simple to display a rectanglar plane just on top of the target image. Open index.html with editor of your choices, and paste the following content:
TempusXR comes with an AFRAME extension that allows you to construct a 3D scene easily. We will not go into the details of AFRAME in this tutorial. If you want to learn more about it, please refer to AFRAME
In short, you can see the <a-scene> block inside body. This is the main part of the application. If you don't have AFRAME background, don't worry. Most of the time you can just copy this block of code as a template to start.
We'll highlight two things here related to TempusXR.
Within <a-scene> you can see a property TempusXR-image="imageTargetSrc: ./targets.mind;" It tells the engine where is the compiled .mind file you built earlier.
There is an <a-entity>, with a prpoerty TempusXR-image-target="targetIndex: 0". This tells the engine to detect and track a particular image target. The targetIndex is always 0, if your targets.mind contains only a single image. You can however compile multiple images together, and the targetIndex will follows the order of the images. We will talk more this later when we have multiple image targets.
tip
Remember this. The AR engine only does ONE thing! - It updates the visibility and positions of a-entity
The AR engine consume your camera feed, then detect, track the target images and update the visibility and positions of this a-entity. It means, whatever attached to the entity will be properly magically displayed accordingly. Once you have this setup properly, what you usually need to do is to construct the content inside this a-entity according to your application needs.
This is minimal case, you see a <a-plane color="blue" opaciy="0.5" position="0 0 0" height="0.552" width="1" rotation="0 0 0"></a-plane>. This is the object we want to show on top of the target image. Obviously, it's just a blue plane.
tip
width=1 means the width is the same as the target image
As you can see we set the width to 1, to make it having the same width of the target image in reality. Why are we setting the height to 0.552, you asked? Good question, because the target image has a ratio of 0.552/1. If you set height to 1, which means also equal to the width of the target image. It will turn out to be a square (You should try and see the effect). Now this rectangular plane will perfectly overlay the target image.
Also, note that the anchor point of the entity is the center of the target image.
Now, you are all set! Let's head over to the next section and see the effect!
Although, it's a simple html page, you probably cannot run it simply by opening the file in browser. The reason is that the page requires camera access.
I believe there are many possible workarounds to that problems, like setting the browser policy or something. One way to this problem is to setup a localhost server that can server webpage.
If you are web developer, I'm sure you probably have some sort of localhost already in your machine. If not, you can try this chrome extension: Web Server for Chrome. It will launch a simple web server, and you can use it to open the index.html built in the last section.
It's likely that you now are using your desktop computer to go through this tutorial. In that case, you can start run the webpage with your computer, which hopefully has equiped with a webcam.
Then, you can use your mobile phone to open this target image, and put your phone screen in front of your desktop webcam to see the effect.
If you don't have two devices, you can also choose to print this image out and test it in paper.
Make sure you get it working before going to the next section, in which we will start doing interesting stuff!
The first thing we need to do is to add some assets to the scene. In AFRAME, we do this by a-assets. Add this block of code inside the <a-scene/> element
The first one is actually our target image. The second one is a 3D model in gltf format. AFRAME basically supports all the standard 3D format, so you can probably replace it with the models of your choices later.
The scale of the 3D model we use here was normalized to -1 to 1, therefore we set an appropriate scale 0.005. We also have an animation to make the model oscillate between 0 to 0.1 in z-axis. We will not go into the details of the animation, but they are just standard AFRAME stuff.
Finally, we have also modify some rendering properties inside <a-scene> (Optional)
Jittering is a common issue in AR applications. The library computes the position of the targets in every frames. The problem is that there are always slight variations across aframes (e.g. noises coming from camera input or computational errors) even though you may think you are holding the devices steadily. Result is that the augmented contents will appear shaky.
One solution to smooth the jittering is to apply filtering. At a high level, it means taking some kind of rolling average of multiple frames to position the targets. The contents will then appeared more stable.
However, smoothing also comes with a price. Since we are using the previou N frames to interpolate the position, there will be a delay for the content to move to the latest position. This is more obvious if you move the camera quickly.
TempusXR implements OneEuroFilter. There are two adjustable parameters called cutoff frequency (filterMinCF) and speed coefficient (filterBeta). In general, decreasing the value of filterMinCF can reduce the jittering and increaseing the value of filterBeta reduce the delay. They are, however, somehow fighting against each others.
They default values of filterMinCF and filterBeta are 0.001 and 1000. You can change them by specifying these parameters in TempusXR-image attribute. e.g.
By default, there is a small intentional delay to trigger the target found event to avoid false positive. More specifically, it requires the target image being detected in a continous of warmupTolerance frames to be considered a success. The default value of warmupTolerance is 5, and you can change it by specifying this parameter in the TempusXR-image attribute, e.g.
Similar, there is also a small intentional delay to trigger the target lost event. It requires the target image being un-detected in a continuous of missTolerance frames. The default value of missTolerance is 5, and you can change it by specifying this parameter in the TempusXR-image attribute, e.g.
If you do this, then none of the above will be shown.
Now, instead of setting them to no, you can also put down the id of the DOM element, e.g. uiScanning=#example-scanning-overlay; This element will be your new scanning screen, and you can make it look like however you want.
For example, I can modify the scanning screen to include a semi-transparent target image at the center to guide user. Live Demo
Let's take a look at the most important elements in the above example. First of all, you need to have an element with id=#example-scanning-overlay. The AR engine is going to add/remove a class name hidden according to the default logic (i.e. when the scanning screen should show/hide)
Normally, you want to hide it display: none when in hidden state. The rest are just standard HTML and css, so we will omit here. You can look at the source of the example to see how I implemented it if you are interested.
You can do the exact same thing with Loading and Error screen.
If you want more freedom, you can disable our default ui completely and write your own. You might want to do this because, for example, you want the loading screen to show longer because you want to wait for other things other than TempusXR.
To do that, you will have to interact with events API. This will be discussed in the next example.
arSystem provides a few api call to control the engine lifecycle
arSystem.start(); // start the engine
arSystem.stop(); // stop the engine
arSystem.pause(keepVideo=false); // pause the engine. It has an optional parameter. if true, then ar will stop, but camera feed will keep
arSystem.unpause(); // unpause
By default, AR engine will start immediately, but you can disable the auto start by giving a param autoStart: false inside <a-scene>
After arSystem.start(), or autostart, AR engine needs to boot up, when it's ready, this event will be fired up. You can listen to this event throught the scene element
Sometimes, AR engine might be failed to start. There could be many reasons, but one most likely reason is camera failed to start. When this happens, this event will be fired up.
When you want to do inteaction with the content, one thing you likely want to detect is when the user click/touch a certain elements. Actually, this is AFRAME stuff, but we'll also included here for reference.
First, you need to include the following cursor and raycaster in the <a-camera> element like this:
and then in the object that you want to detect, add a class clickable. Actually, it doesn't mean to be clickable, but the same as what you specified in the raycaster above.
This is a comprehensive example that showcase what can be done by utilizing all the available heatures provided in TempusXR. There is nothing new, so we will not go into the details. You can checkout the Demo and view the complete source for references.
TempusXR project can be run in plain static HTML file. It's super easy!
In this quickstart guide for face tracking, you will build a simple virtual tryon application. It will start the device camera, detect a face, and show some augmented objects.
Let's start with a minimal example to understand how face tracking work in TempusXR. Create a blank index.html with editor of your choices and paste the following content:
Although, it's a simple html page, you probably cannot run it simply by opening the file in browser. The reason is that the page requires camera access.
I believe there are many possible workarounds to that problems, like setting the browser policy or something. One way to this problem is to setup a localhost server that can server webpage.
If you are a web developer, I'm sure you probably have some sort of localhost already in your machine. If not, you can try this chrome extension: Web Server for Chrome. It will launch a simple web server, and you can use it to open the index.html built in the last section.
The first thing we need to do is to add some assets to the scene. In AFRAME, we do this by a-assets. Add this block of code inside the <a-scene/> element
It's a 3D glasses model in gltf format. AFRAME basically supports all the standard 3D format, so you can probably replace it with the models of your choices later.
Now we can replace the dull sphere in the earlier example with this glasses. We also changed the anchorIndex to 168 because that is a better position for glasses.
If you turn your head a bit, you will probably notice a problem (the arm of the glass should be invisible since it's behind the head):
It's a common problem in augmented reality application. AR application does not alter the video. Instead it is jsut merely drawing another layer on top. Therefore, none of the video content can obscure our drawing layer (i.e. augmented realty objects).
To solve this issue, we will need to add an aribitrary 3D head-like object in the scene. But unlike a regular 3D object, this arbitrary head has two special properties. First, obviously it needs to be transparent. Second, despite being transparent, it still need to cover every behind. Normally, we call this kind of special 3D objects as occluders.
Adding a occluder object is very similar to adding a regular object. In TempusXR, you just need to add a property tempusxr-face-occluder to the entity.
One major limitation of occluder is that the arbitrary head is a predefined 3D model, and the shape won't fit perfectly with the persons' head in the video.
That's more or less everything you need to know about face tracking in TempusXR. It's extremely to use, you pick anchor points and put objects there.
To make a fully functional virtual try-on application, you just need to prepare more 3D objects and add them to the scene. Then you programatically control their visibilities.
This example demonstrates how to handle events from tempusxr engine. It also explains how to programatically control the lifecycle of AR engine, including start, stop and switching camera.
The full source code is attached first and we will go through them one by one.
tempusxr will fire the events when the followings happen:
arReady
After arSystem.start(), or autostart, AR engine needs to boot up, when it's ready, this event will be fired up. You can listen to this event throught the scene element
Sometimes, AR engine might be failed to start. There could be many reasons, but one most likely reason is camera failed to start. When this happens, this event will be fired up.